To ensure proper operation of PTS, you have to configure Windows Server and install the required components before you install the product.
To ensure proper PTS operation, check settings for the application pool and virtual directories of the PTS web applications in Internet Information Services (IIS) Manager.
To use PTS with the HTTPS secured protocol, you must have Internet Information Services 7 configured appropriately (supported on Windows Vista, 7, Server 2008/R2).
Solution
Proceed as follows:
The PTS application server stores the information on users and translation servers in the special MS SQL Server database.
PTS supports the following versions of MS SQL Server:
- %programfiles%\PRMT9\PTS\ApplicationServer\App_Data\TWS.MDF (in case the MS SQL Server is on the same computer where PTS is installed)
- \\PTS_server_name\App_Data\TWS.MDF (if MS SQL Server runs on a separate computer, the %programfiles%\PRMT9\PTS\ApplicationServer\App_Data folder shall be shared – only for MS SQL Server 2008)
PTS does not support adding of user accounts directly from the Active Directory.
Adding of a large number of accounts to the PTS user database and subsequent adding of these accounts to the appropriate PTS group may require time-consuming configuration of the PTS system.
You can use the procedure to automate adding of user accounts from the Active Directory groups to the PTS user group.
If you are interested in this solution, please contact the PROMT user support department for additional information.
e-mail: support@promt.com
Information in this article concerns the following products:
PTS 9.0, PTS 9.5
Anonymous access does not require authorization and allows the user not to enter the necessary data when connecting to the PTS server; thus it facilitates user accounts control and administration.
If there are many PTS users, you can use the anonymous access option.
The anonymous access option in the PTS product is defined by the license file, the licensing scheme of which shall support the unlimited number of the PTS users.
If you are interested in this solution, please contact the PROMT user support department for additional information.
e-mail: support@promt.com
Information in this article concerns the following products:
PTS 9.0, PTS 9.5
PTS products provide the option to use several translation servers connected to a single application server. Several translation servers allow to use load balancing and fail-safety mechanisms of the PTS application server and to increase the speed of processing translation requests.
Sometimes, due to certain reasons, installation of additional translation servers on the selected physical/virtual servers is impossible, but a solution for PTS stability improvement is still required (for example, owing to high load of the translation server). In that case, if PTS license arrangement admit adding translation servers, a solution can be used which provides duplication of the translation server web application on the same server where the application and translation servers are installed.
Increasing the number of translation server web applications allows you to use load balancing and fail safety mechanisms of the application server, thus improving the PTS stability. Meanwhile, the overall performance is not increased, because a single translation core is used.
If you are interested in this solution, please contact the PROMT user support department for additional information.
e-mail: support@promt.com
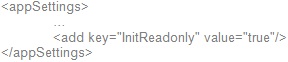
Note
This solution has a restriction: you have to initialize linguistic data in the Read-Only mode. For more details, see [KB24005] Improving the PTS stability by initializing linguistic data in the Read Only mode.
Information in this article concerns the following products:
PTS 9.0, PTS 9.5
PTS 9.5 provides embedding of translation functions for the following applications:
PTS allows for direct text translation in Windows applications.
You can find out what Windows applications are supported by your PTS product from the appropriate item of the knowledge base: [KB25001] PTS Plug-ins – what Windows applications are supported?.
If you need to install PTS plug-ins on a large number of workstations, refer to section [KB25003] Installing the PTS Plug-ins to workstations using the Active Directory group policy in the knowledge base.
You can automate the PTS plug-ins installation to workstations, for example, on enterprise-scale networks.
This section describes the procedure of mass installation of PTS plug-ins using the Active Directory group policy.
Solution
To install the PTS plug-ins using the Active Directory group policy, proceed as follows:
Example:
\\server_name\share_name\setup.exe /L1033 /S /v/qn
PTS plug-ins will be installed silently with English as the interface language
After the specified procedures are completed, the PTS plug-ins will be installed automatically on the department workstations that can be accessed via the network.
After you installed the PTS plug-ins, it is recommended to use the suggested method to automate the PTS plug-ins setup.
The method is described in section [KB25004] Customizing the PTS Plug-ins on workstations using the Active Directory group policy
In enterprise-scale networks, it is convenient to install and configure PTS plug-ins on workstations automatically.
The procedure for mass installation of PTS plug-ins using the Active Directory group policy is provided in section [KB25003] Installing the PTS Plug-ins to workstations using the Active Directory group policy.
This section describes the procedure for automation of the process of configuring PTS plug-ins to use the required PTS server connection string after plug-ins installation. Thus the users will be able to use plug-ins right away, without needing to enter the connection string manually and to restart the application.
Solution
To configure PTS plug-ins using the Active Directory group policy, proceed as follows:
Problem
Translation functions are embedded into Adobe Reader X, but the address of the PTS translation server is not saved.
Solution
Disable the protected mode at starting Adobe Reader X:
Problem
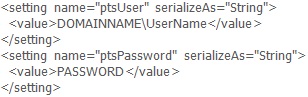
PTS has no function of saving the authentication data for connecting to PTS server in plug-ins.
Solution
There is a new distributive set of PTS plug-ins which allows to save the authentication data for connecting to PTS in plug-ins.
If you are interested in this solution, please contact the PROMT technical support department for additional information.
e-mail: support@promt.com
Information in this article concerns the following products:
PTS 9.0, PTS 9.5
Problem
PTS has no function of saving the authentication data for connecting to PTS via Proxy in plug-ins.
Solution
There is a new distributive set of PTS plug-ins which allows to save the authentication data for connecting to PTS via Proxy.
If you are interested in this solution, please contact the PROMT technical support department for additional information.
e-mail: support@promt.com
Information in this article concerns the following products:
PTS 9.0, PTS 9.5
Subscribe
